October 07, 2025
Introduction
In the past, friends have asked me: "My living room is so echoey, I'm thinking about getting some acoustic panels for my wall. Do you have an recommendations?". My first counter-question is always: "Do you have anything on your wall? Like, anything whatsoever?". Generally, the answer is "no". In that case, I usually just tell them to get nice painting or tapestry for their wall and see if that fixes it.
I believe you can get a good sounding room — without annoying echoes — by simply adding stylish furniture and wall decorations. Don't get me wrong: dedicated acoustic panels are really nice and can do wonders for your room's acoustics, but they are generally overkill for what you're trying to achieve.
It does does raise the question: How much do "normal" decorations actually do to the acoustics of your room? Let's grab our µZ-20 impedance tube and find out. To measure is to know, after all.
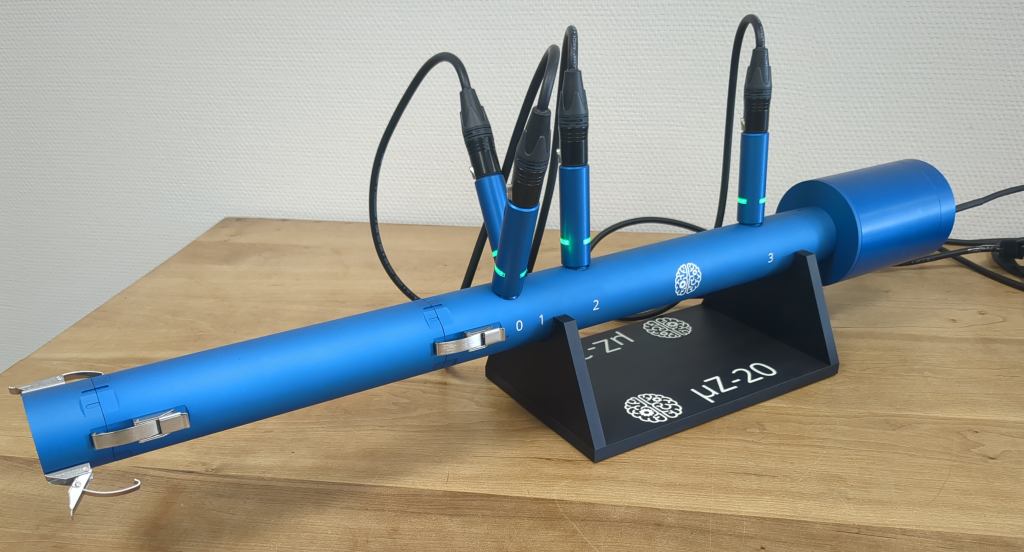
A µZ-20 system configured to measure the absorption coefficient of a piece of material
The µZ system
For those unacquainted with the µZ system; a quick introduction. µZ is an impedance tube we developed, especially for measuring the acoustic properties of small, thin acoustic samples. However, it can also be used for standard impedance tube measurements. For example, measuring the absorption coefficient of acoustic samples, which is what we will be doing in this case. The specific system we are using during the tests is a µZ-20, which has a 20 mm inner diameter and can measure over the frequency range from 20 Hz to 8 kHz.
Absorption coefficient
Before we start, let's take a moment to consider what we will be measuring and why. When a sound wave encounters a surface or object, three things can happen: transmission, reflection, or absorption. Echoes occur when sound is reflected back towards its source. To reduce reflections, the transmission or absorption must be increased.1 Since in our examples "increasing transmission" essentially means knocking down the walls in your living room, we will focus on increasing absorption. Sound absorption occurs by adding materials that convert sound energy into different forms of energy, typically heat.
So, how do we measure absorption? Our µZ impedance tube is a long narrow tube. As a result — up to a certain frequency called the "cut-on frequency" — the sound field can be considered to be 1-dimensional. Sound only propagates along the length of the tube and the pressure only varies in that direction. As a result, we can describe the complete sound field as the sum of two waves: the incident wave and the reflected wave.

Diagram of the µZ-20 system configured to measure the absorption coefficient of a piece of material
By calculating the amplitude ratio between the reflected and incident waves, we obtain the reflection coefficient $R$. We then define the absorption coefficient as $\alpha = 1-|R|^2$. In other words, we quantify the sound absorption as the amount of sound energy that is not reflected.2 The absorption coefficient ranges from 0 (all sound is reflected) to 1 (all sound is absorbed). As we will see later on, the absorption coefficient is not a single value. Instead, it varies with frequency.
Note that whenever we refer to the amount of absorbed sound, we are talking about the amount of sound energy that is absorbed for a normal incident wave.
The sample
Since the µZ-20 has an inner diameter of 20 mm, we need material samples in that size. Obviously, We're not going to cut up a nice tapestry of painting (we're scientists, not barbarians). Instead, we're going to use a piece of 6 mm thick carpeting that was left over from the floor of our office.
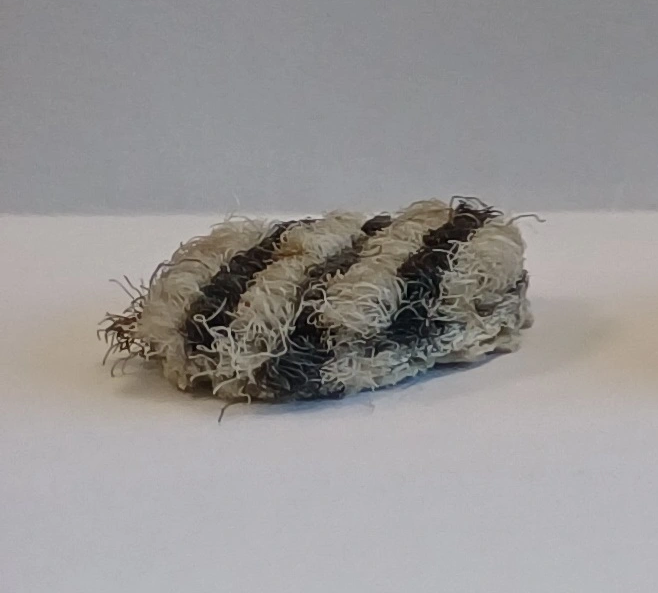
Sample of 6 mm thick carpet
The measurement
Measuring sound absorption with the µZ system is incredibly quick and simple thanks to the included ACME software. After calibrating the system by following the step-by-step instructions in the software, all we need to do is run a single measurement with the sample in the tube, select the absorption coefficient option in the µZ analysis tool and click compute.
Prior to the measurement, the sample needs to be "loaded" into the measurements tube, snugly against the hard end. The hard end is detachable, so the sample can be inserted from that end. However, since this sample is so thin it is prone to tilting. This means we have to reach all the way down the 20 cm long, 20 mm diameter measurement tube to press the sample into place. Luckily, a long, slender ruler doubles perfectly as a ramrod.
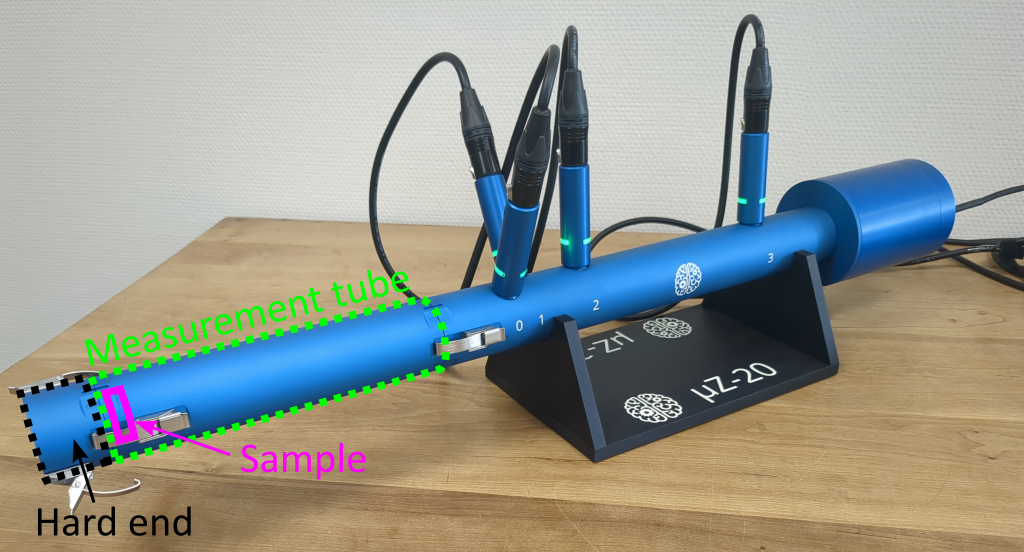
A µZ-20 system configured to measure the absorption coefficient of a piece of material, with the relevant parts annotated
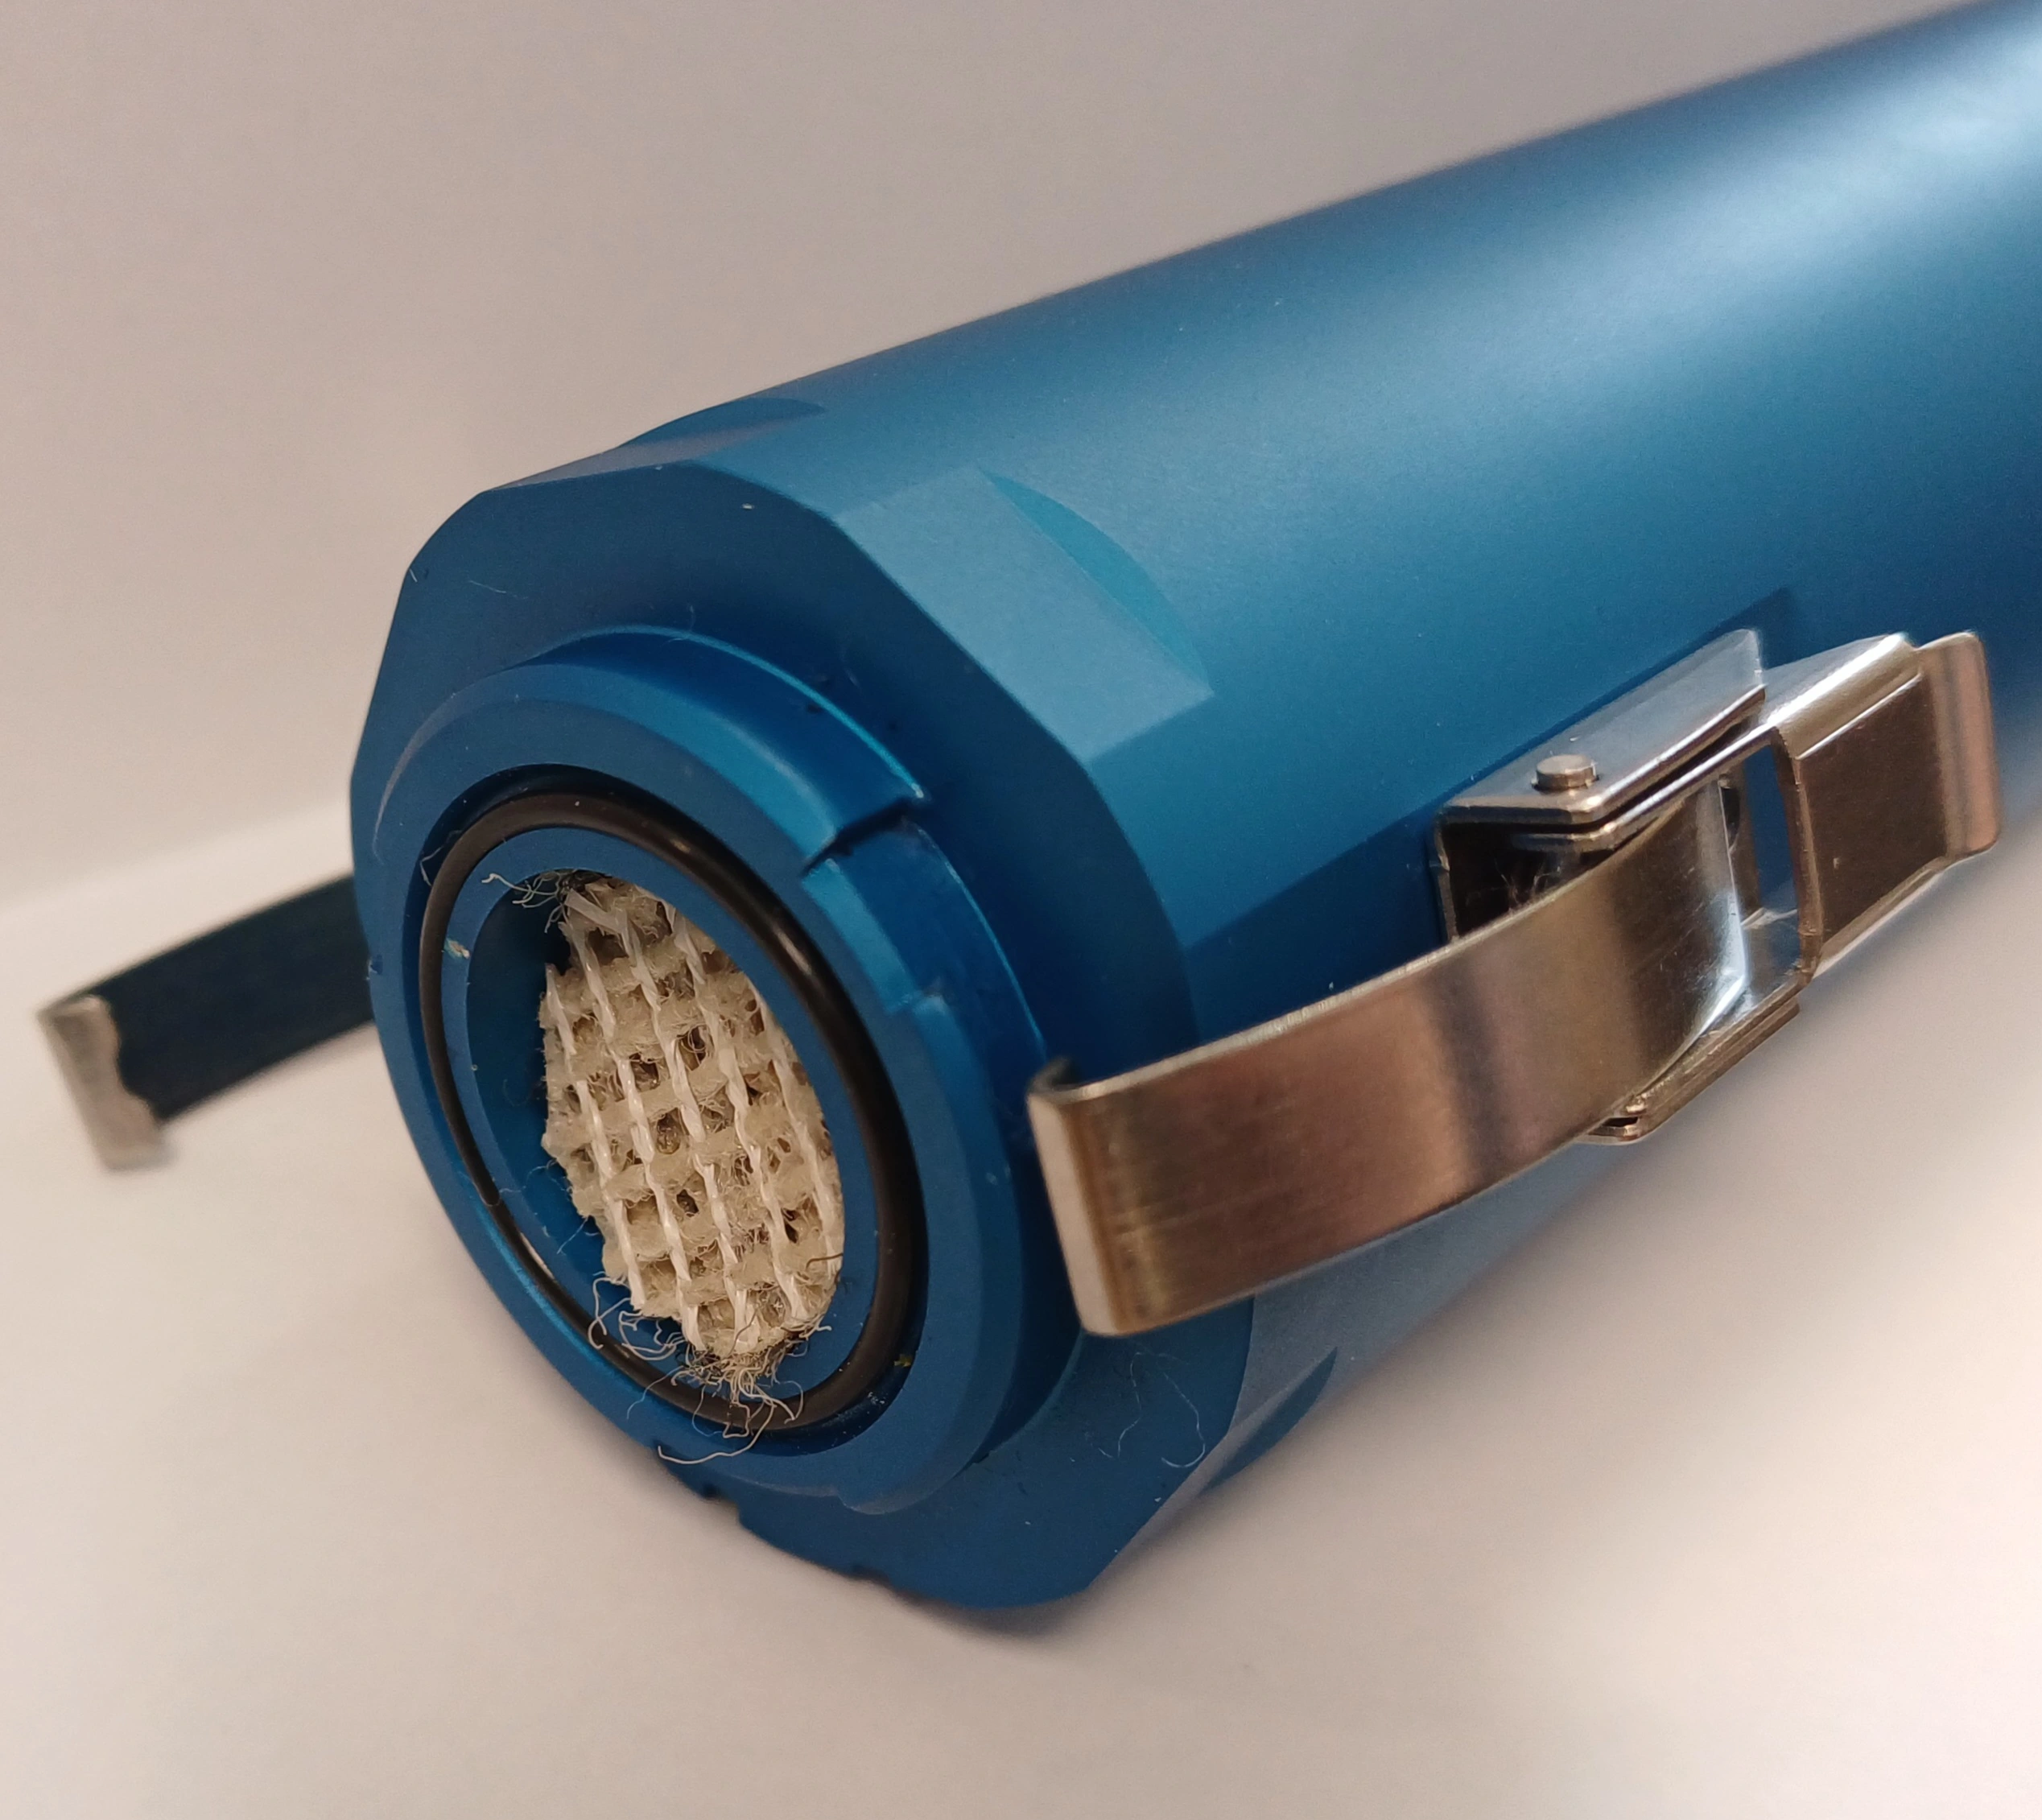
Tilted sample of 6 mm thick carpet inside measurement tube
Results
The measured absorption coefficient for the carpet sample shown in the figure below. The absorption coefficient of a hard metal end is included for reference. The hard metal basically has an absorption coefficient of 0, meaning it doesn't absorb any sound and reflects all of it.
The carpet doesn't absorb any sound at low frequencies. However, at higher frequencies there is significant absorption. At 2 kHz, the carpet absorbs about 10% of the sound. This increases to 50% near 5 kHz and peaks at 75% around 6.5 kHz. Relatively impressive peak levels, but quite disappointing in terms of frequency range.
This property of absorbing only the high frequencies means the carpet won't get rid of echoes, but it will change their characteristics. Getting rid of the "sharp" high frequencies will result in a more dull sound.
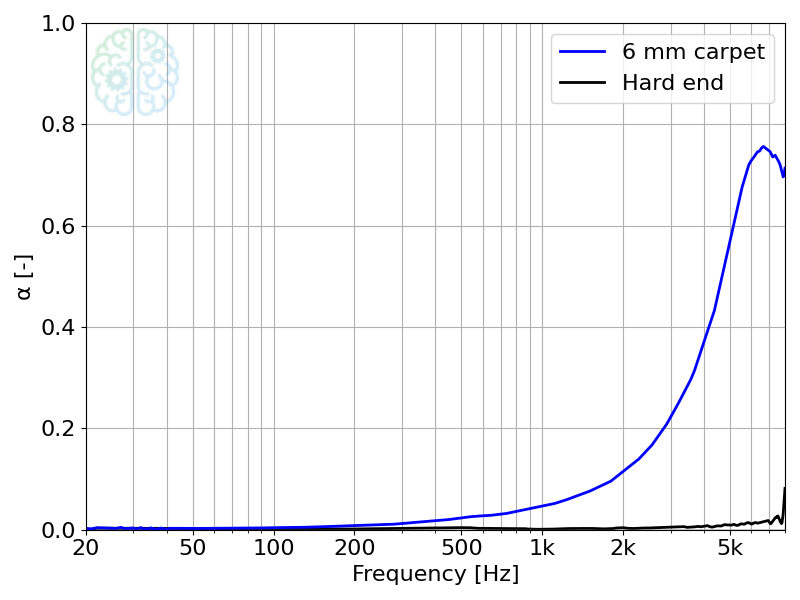
Measured absorption coefficient for the 6 mm thick carpet sample
¡Underlay! ¡Underlay! ¡Arriba! ¡Arriba!
Of course, no self-respecting carpet layer simply puts down some carpet. You have to start with underlay. We have some 8 mm thick underlay material (shown with the "this side up" side down in the picture below) that I brought in from home. This material is primarily meant for vibration damping, but surely it will absorb some sound as well, it's all foamy and everything. Let's put it to the test.
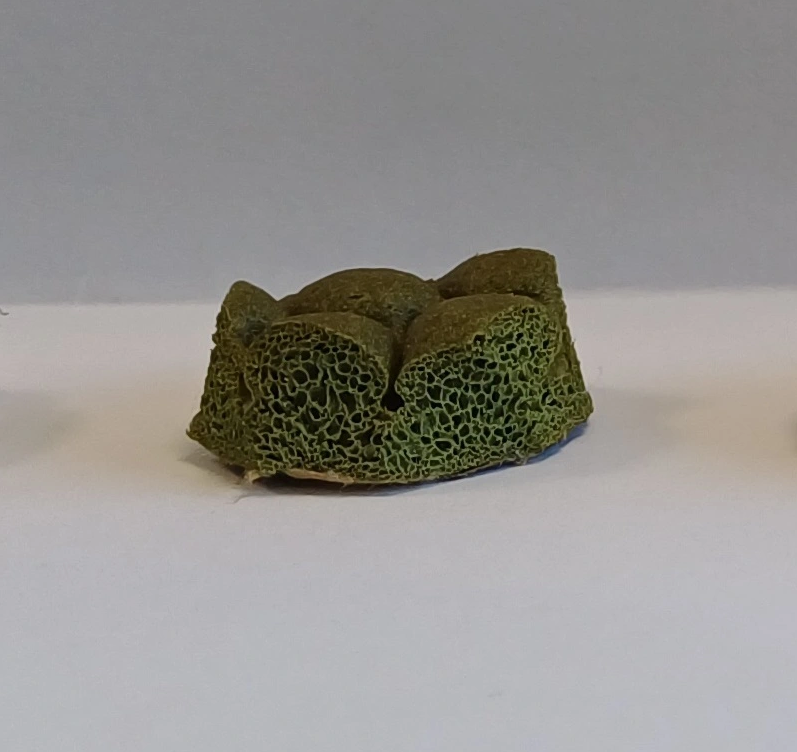
Sample of 8 mm thick underlay material
The measured absorption coefficient of the underlay sample is shown in the figure below, together with the previously shown result. The sound absorption characteristics of the underlay is quite different from that of the carpet. It absorbs sounds at much lower frequencies, reaching 20% absorption around 500 Hz instead of 3 kHz. However, that's were it peaks. There is no significant increase in absorption coefficient at higher frequencies. Decent frequency range, but disappointing peak levels.
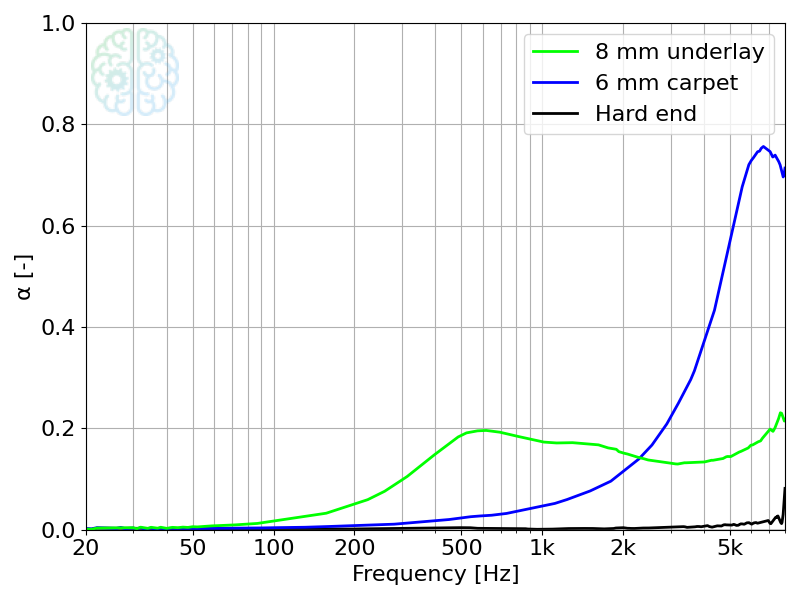
Measured absorption coefficient for the 8 mm thick underlay sample
The carpet and underlay both have their strenghts and weaknesses in terms of sound absorption. Obviously, in practice these materials are not used separately, but as a stack. How does the sound absorption of these two samples together compare to that of the separate layers? Let's find out.
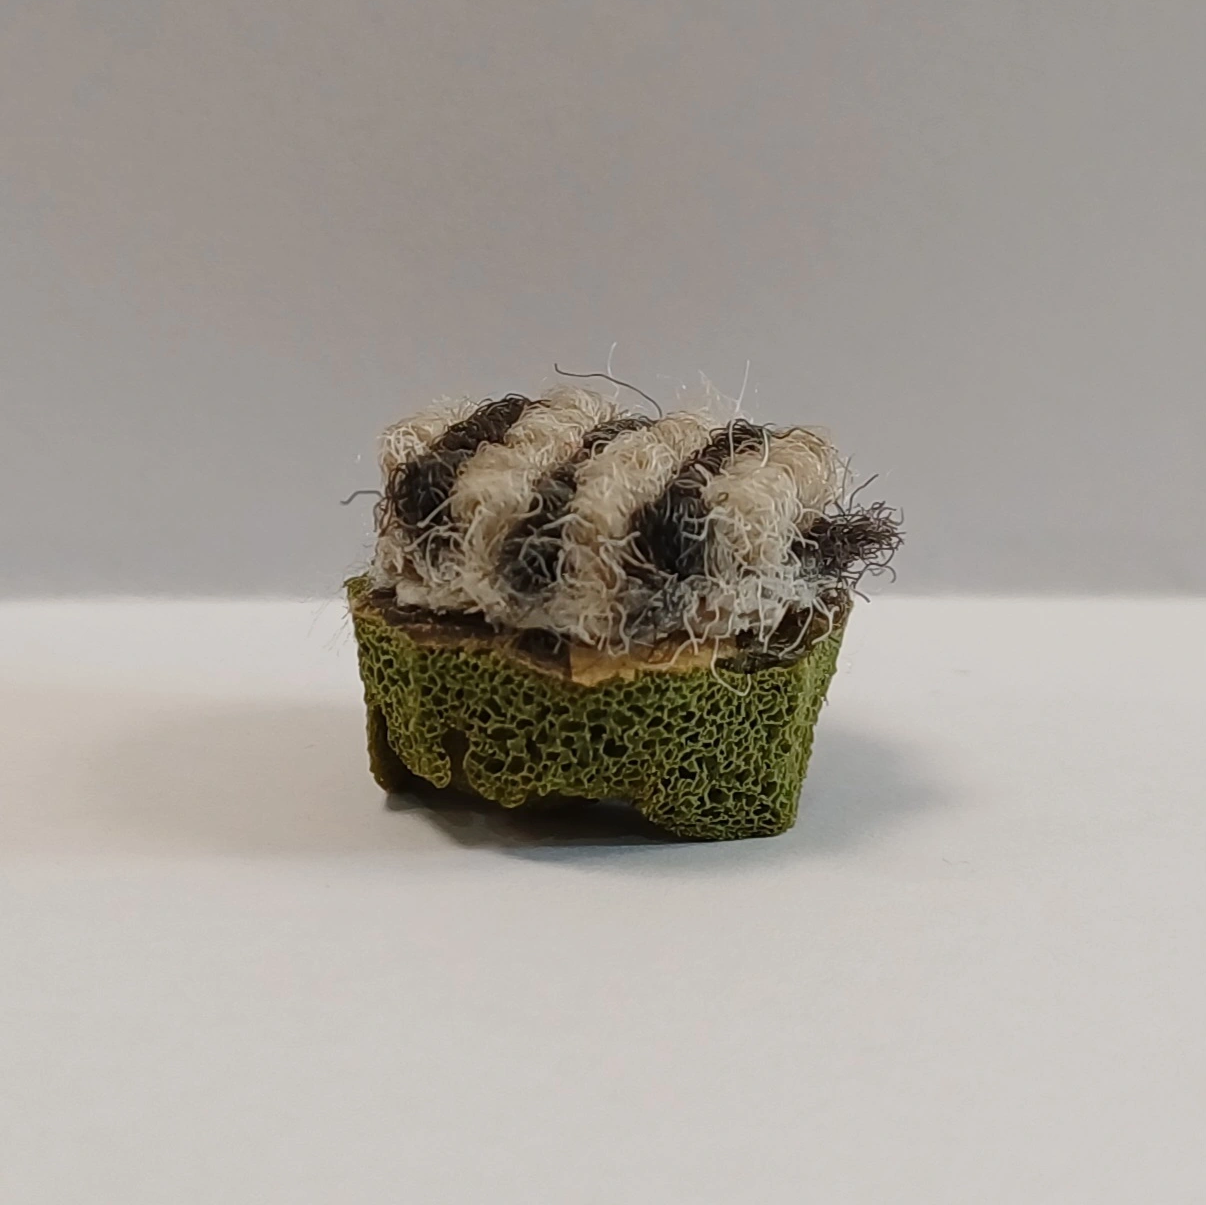
Stackup of the carpet and underlay samples
The measured absorption coefficient for the carpet-underlay stack is shown in the figure below, together with the results for the separate layers. The properties of both layers are clearly visible. Below 1 kHz, the sound absorption of the stack is basically equal to that of the underlay layer.3 Above 6 kHz it absorbs the same amount of sound as the carpet layer. Between 1 kHz and 6 kHz the stack has a higher absorption coefficient than either of the two layers. In a way, the absorption coefficient of the carpet and underlay together makes sense based on their individual properties. However — as we will touch on later — this result might be more surprising than you think.
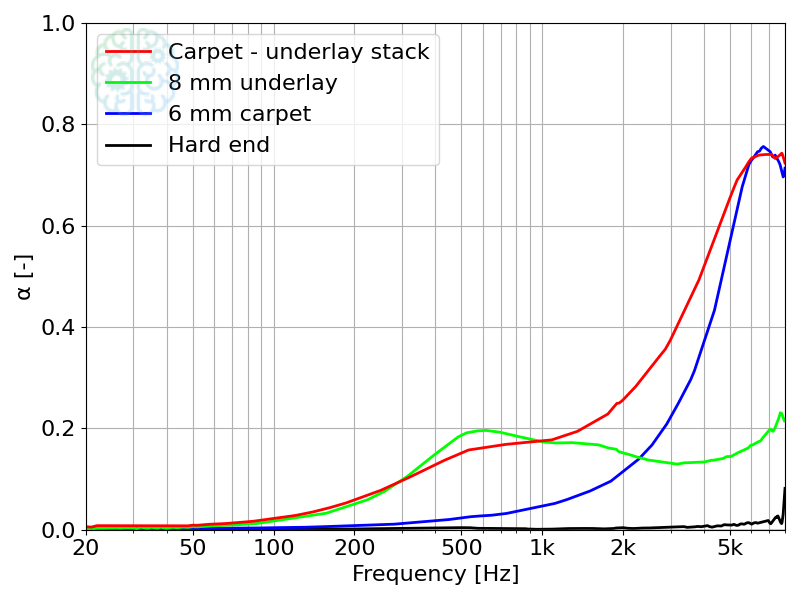
Measured absorption coefficient for the stacked carpet and underlay samples
One man's trash is another man's acoustic foam
This leaves the question: How does the sound absorption of regular carpeting stack up to that of dedicated acoustic materials? To put this to the test, we have a rebonded foam sample of similar thickness to the carpet. Rebonded foam is made by pressing together scraps of recycled foam and bonding them with a liquid adhesive, making it both eco-friendly and cheap. Especially the latter property makes it a popular material for noise and vibration damping, among many other applications. So how good is it at absorbing sound?
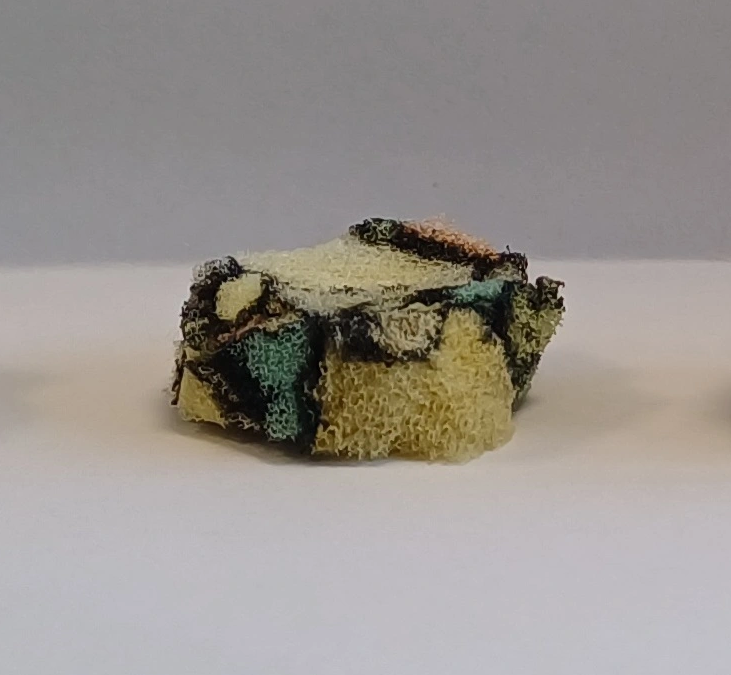
Sample of 6 mm thick rebonded foam
The measured absorption coefficient for the rebonded foam is shown in the figure below, together with the previously discussed results. Interestingly, the result is quite similar to the carpet. It performs slightly better between 500 Hz and 5 kHz, but even there it absorbs less sound than the carpet-underlay stack. The main strength of this sample is its damping at high frequencies. The sound absorption of the carpet peaked at 75%. The sound absorption of the rebonded foam reaches 90% at 8 kHz and — judging by the shape of the curve — it likely reaches an even higher level above 8 kHz. Overall, the sound absorption of rebonded foam is similar to carpet in terms of frequency range, but better in terms of absorption levels.
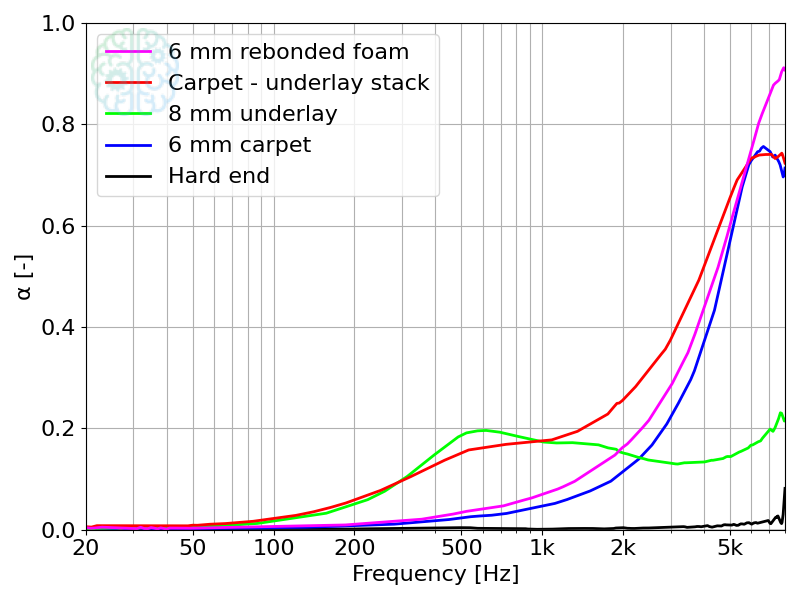
Measured absorption coefficient for 6 mm thick rebonded foam sample
We have specified the thicknesses of all the samples that we've tested so far. This is for a good reason, since the absorption coefficient of a sample is not just determined by its material, but by its thickness as well. To illustrate this point, let's measure some samples of the same material but different thickness. We'll use rebonded foam, since getting carpet or underlay samples in different thicknesses is highly impractical. More specifically, we will be using rebonded foam samples of 6 mm, 12 mm, 24 mm and 36 mm thick. How will this impact the results?
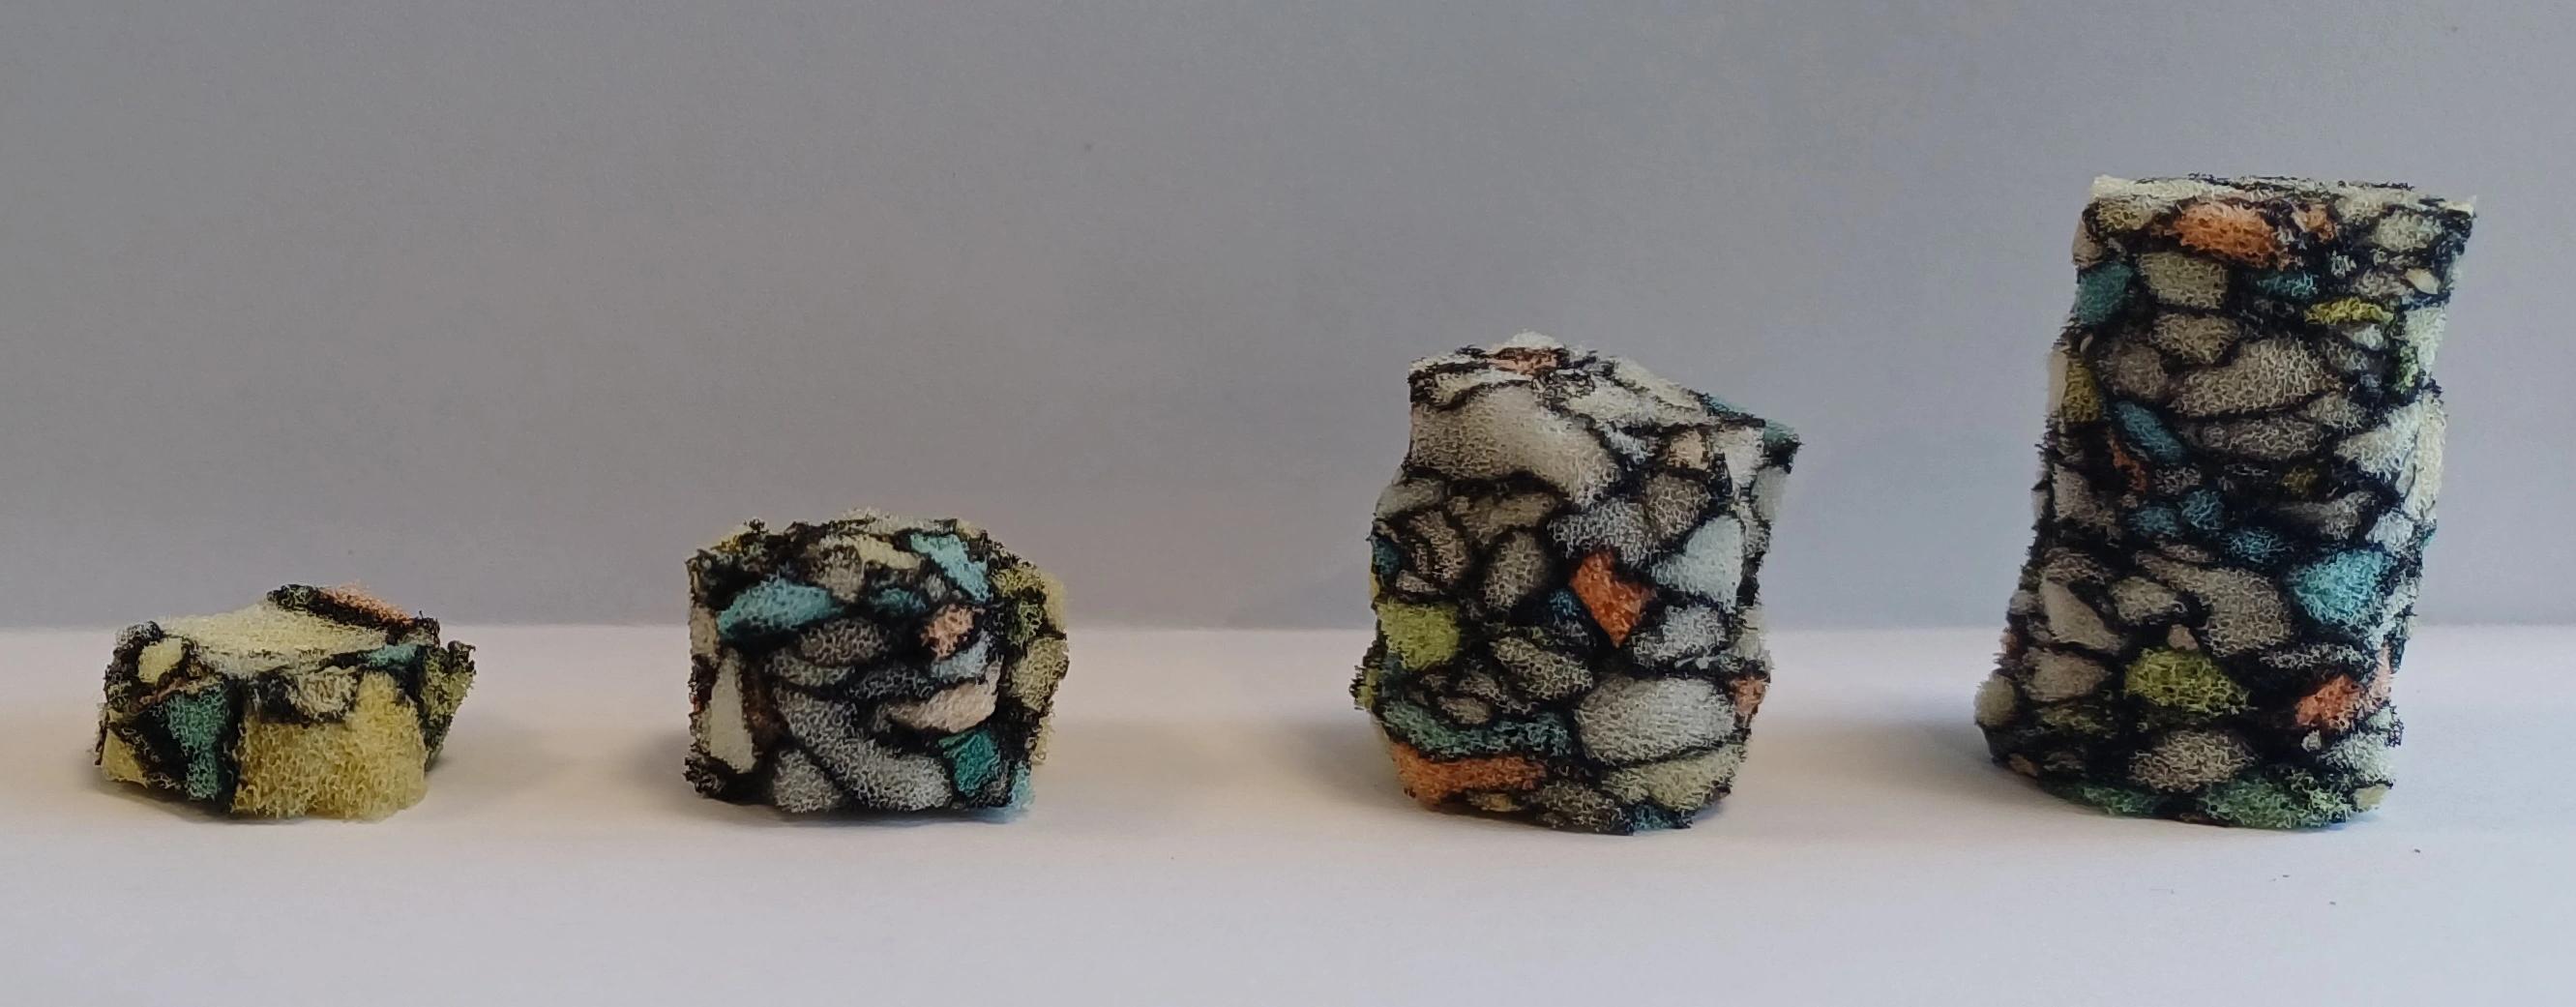
Rebonded foam samples of various thicknesses
The measured absorption coefficient for the rebonded foam samples are shown in the figure below, together with all previous results. The effect of the thickness of the samples is quite clear. The absorption coefficient curves are essentially the same for all samples, but shifted along the frequency axis. This shift is linear with sample thickness. For example, the sound absorption of the 6 mm thick sample reaches 40% around 4 kHz. For the 12 mm sample its around 2 kHz. For the 24 mm sample its around 1 kHz. And so on.
These samples of higher thickness also nicely show that the sound absorption of the foam does not peak at 90%, but goes all the way to 99%. For the 36 mm thick sample — which is about the thickness of a standard foam plate — more than half the sound is absorbed above 750 Hz. At frequencies below 200 Hz the sound absorption is still negligible. If you want to effectively damp all audible sound, you will require foam of several meters thick. That will significantly eat into your living space.
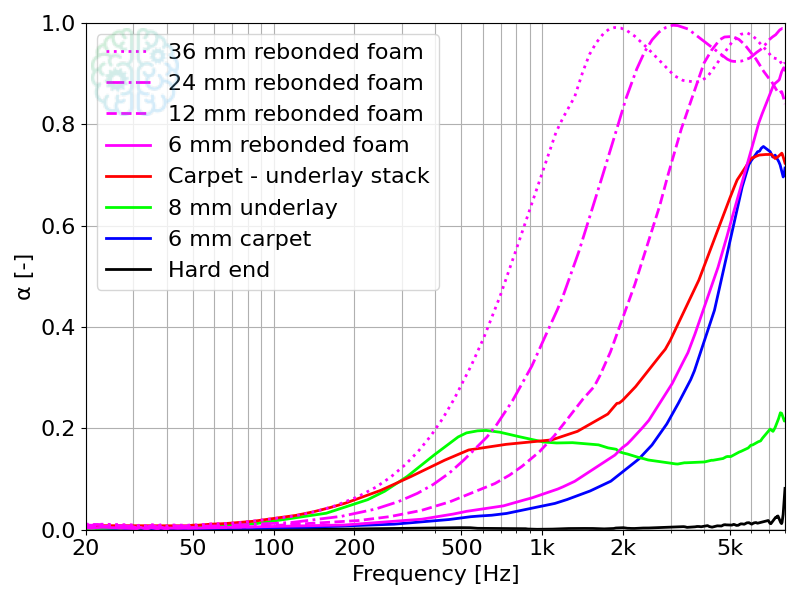
Measured absorption coefficient for rebonded foam samples of various thicknesses
It doesn't add up
Before wrapping up, let's revisit the results for the carpet-underlay stack. We have seen that using a thicker layer of rebonded foam extends the absorption to lower frequencies. However, this effect doesn't seem to apply to the carpet-underlay stack; it basically exhibits the same properties as its separate layers. Why is this? Shouldn't the 6 mm carpet and 8 mm underlay effectively function as a 14 mm sound absorbing layer?
The answer lies in the material properties of the underlay. Although I said the material looks "foamy", the actual word I should have used is "spongy": the cells of air in the material are mostly closed. This particular underlay is made from a material called "sponge rubber" and its main purpose is to isolate mechanical vibrations. In other words, it is mostly meant to prevent you from keeping your neighbors up at night when you're stomping, dancing or doing jumping jacks in your living room. It is not designed to absorb airborne sound. As a result of the closed cells, sound can't easily penetrate the material, preventing the carpet-underlay 14 mm stack from behaving like a 14 mm thick sounds absorbing layer.
What have we learned?
- Carpet won't win any awards for its sound absorbing capabilities. However, it does absorb the majority of sound at high frequencies, which will result in more dull sounding echoes.
- Adding underlay slightly increases the sound absorption of your flooring at lower frequencies, although its peak absorption is low.
- Rebonded foam doesn't absorb sound across a wider frequency range than carpet of the same thickness. However, at the frequencies were it does work it has a higher absorption coefficient, especially at high frequencies.
- Sound absorption at lower frequencies can be achieved by using thicker layers of absorbing material. However, for the really low frequencies, the required layer thicknesses will become impractical.4
- The frequency range scales linearly with material thickness. However, this does not apply to closed cell materials — like spone foam underlay — or stacks that include such materials.
Overall, wall decorations and furniture can help you reduce annoying echoes, but for properly good acoustics and noise isolation, you will need dedicated acoustic materials, preferably thick layers of them.

The samples used during the measurements
-
There is another way of reducing echoes: scattering. However, this is a wholly different topic that we won't get into for now. ↩
-
Due to this definition, the amount of "absorbed" sound energy calculated by the µZ system technically also includes any sound energy that is transmitted. However, since the tube is terminated with a thick metal wall, the amount transmission is negligible. Therefore, the calculated absorption coeffient can be considered an accurate measure of the absorbed sound energy. ↩
-
Near 500 Hz, the sound absorption of the stack appears worse than that of the separate underlay layer. This is due to there being some variation between measurements on the underlay material. Due to its flexible nature, its exact absorption coefficient is affected by how tightly it's packed against the hard end. ↩
-
As a rule of thumb, a sound absorber has to be at least as thick as 1/4 wavelength at the frequencies it should absorb effectively. To create thinner effective absorbers you could use a labyrinth to fold a longer acoustic path into a smaller depth, or pack a heavy membrane inside the absorption material. For absorption in a narrow frequency range, A Helmholtz absorber works well. ↩